UPDATE - January 2016
You do not want the 70's and 80's setup anymore, the parts are
being discontinued, some are no longer available. The only
part not currently available for the original better 4-piston
Bendix system is the shims, Galvin's AMC Rambler Parts is working
on having them made. A 2nd option is the Wilwood kit (in
stock), which is also 4-psiton.
Safety
You will need a good hydraulic jack .
Two jack stands
Drain pan
Rags
A 1/2 drive socket set and a breaker bar
Open end wrench set up to 3/4 inch
Allen wrenches up 3/8 inch
Brake parts cleaner
Brake lube
Tubing wrenches 3/8 7/16 1/2 maybe 5/8
Brake fluid
Four way lug wrench
Large pair of pliers.
Your going to do this job twice. Your going to find a AMC donor car that has disk brakes. The best years are in the later part of the 70's and all the 80's. And fare price is around $100.00 for all parts . If they want more shop around . Your going to spend a better part of a day removing these items. Besides bring tools bring a plastic milk type create to carry the item back to the building so the yard master can see what your getting.
Ok you found the car write down the model and year of the car you are getting parts from, put this in your wallet years from now you might need a seal or a bearing , rotor , and pads you got the idea now. And if you sell the car pass this information on to the new buyer.
In my part of the country all the cars are off the ground. You'll might have to jack the car up if so remember to block the car up first. Remove the tire save the lug nuts put them back on the rotors.
Remove the brake hose where it hooks to the steal line this is where you need the tubing wrenches . If you can't get them apart cut the steel line above the fitting remove the line with the caliper as a assemble.
Check the rotor if bad find another car. The rotor if bad it could cost another $50.00 apiece . If you cant find any stop go back to the yard master and see if he'll sell you the stuff cheaper. You'll now what to due from there.
Next remove the rotor , to due this remove the dust cover remover the cotter pin. Always use new cotter pins. remover the outer bearing. Pull the rotor off the spindle . Put the outer bearing and spacer washer and nut back in the rotor put the dust cover back on the rotor . This way you keep all mating parts together. This is not hard to do. Remove the adaptor bracket that held the caliper on . Your going to need that breaker bar to loosen the bolts. Remove all the bolts and nuts some of the bolts might be longer than others remember where they go. Once you have removed the spindle, backing plate , And that adaptor bracket put all the bolts back through all the item re install all the nuts. This should of taken about one hour to due the other side will take about half as long.
Put all the parts in the box pay your price your on your way home.
I'm going to due this job on a Marlin but it the same on any Rambler or Amc . If your car has drum brake also get the master cylinder. If the master cylinder doesn't mate up elongate the mounting hole or slot them. It will work just fine. Remember I've done over twenty of these car they all have work fine. You might have to replace the fitting at the master cylinder get the fitting at the junk yard also. There free there and will also save you a trip to the parts store only to find out they don't have any!!
Ok your half way home. Check over what you've got. You don't want to install leaky calipers or bad rotors. And you want to repack the wheel bearing and replace the dust seals. Remer that paper with that info on. You need it now , go get new pads and remember the cotter pins also. You also might want new brake hoses also.
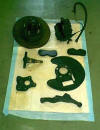
Ok here we go. Here is all the old stuff from one side of the car that isn't needed.
What it looks like all together ready for your wheel.
Undo this fitting
Remove the cotter pin. Use a new ones.
Remove this bolt , also when reinstalling use caliper lube the caliper slides on top and bottom guides
use a Allen wrench to remove the bolt
In is view it going back together remember the lube. You'll need a punch or a drift to reinstall this part tight fit remember to install the bolt in the top after you push this part in .
the donor parts installed In the lower cut out this is the wheel stop. You fill need to shim this back 1/8 inch use lock washer for the shim. The shim will go on to the two bolts to the left of the picture.
 this is the part that you will
need to shim.
the parts you need to install I forgot to take a picture of caliper before I installed it.
WARNING: This upgrade will NOT fix any existing brake problems. So make sure everything else is in perfect working condition. Don't let brake fluid come in contact with your paint. It will ruin it! Don't use tubing compression fittings. They are unsafe and illegal to use in a brake system. Always use double flared tubing ends with brake line nuts. Double check your connections. Test your upgraded brake system away from people.
Disclaimer: This site is not intended to instruct or teach anyone in proper or safe methods of working on or maintaining a car and the author takes no responsibility for the use of the information contained herein.
