This article was taken from the 1962 Rambler American
Technical Service Manual & Modified for Marlins
The 65 and 66 Were the last Ramblers to use this
Old Technology
WINDSHIELD
The one piece windshield , consists of two sheet of plate glass bent and matched , then laminated together and is know as Duplate glass.
The glass is set into a rubber channel which cushions and seals it against the body around the windshield opening when installed as assembly. This assembly consists of the glass , rubber channel and the reveal moldings.
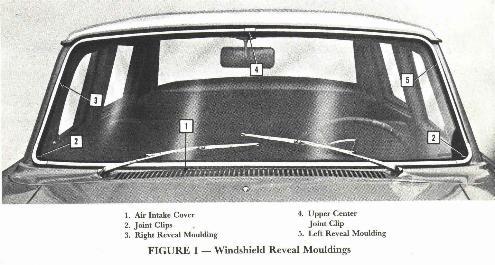
REVEAL MOLDING
The stainless steel reveal moldings have an "L" shaped flange which sets into an "L" shaped groove provided in the rubber channel . The "L" flange extends in the rubber beyond the thickness of the glass and cannot be installed or removed without first removing the windshield assembly . The expansion joints of the reveal moldings are covered with clincher type covers .
WINDSHIELD REMOVAL
Cover the hood with something thick like a blanket over that place paper to prevent unnecessary clean up of sealer and paint damage .
Remove the windshield interior finish moldings at top of windshield , sun visors , and rear view mirror .
Remove the windshield wiper arm and blade assemblies.
With fiber or wedge shape wood stick , loosen the lip of rubber completely around windshield .
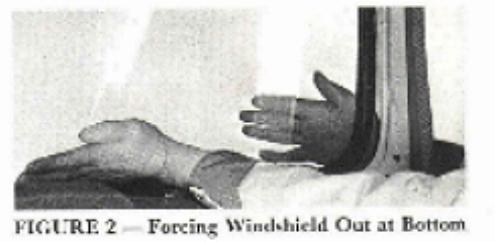
Apply pressure , from the inside , a bottom of the glass directly in line with the windshield wiper pivot shaft , until the lip of the rubber is forced to the outside of the flange ; first one side than the other . My car this didn't work , I had to break the rubber from inside of the car in small pieces . The rubber was not pliable but almost like steel from ageing.
Lift glass assembly from car and place the assembly on blanket . Slide
the reveal molding joint covers to expose the joints .Try pulling
channel rubber away from the glass . Didn't work for me this way had to
use a linoleum knife and cut the rubber away this took for ever .
WINDSHIELD GLASS INSTALLATION
Instructions
This is what I did when I installed my glass .You will need two saw horses padded. Place window on horses clean all old glue and grime off glass both sides. Install new seal dry NO silicone spray adjust to fix . Next clean all your stainless pieces install the two horizontal pieces first then the vertical pieces hook at ends to the horizontal pieces. Adjust to fit there is a small amount play. Turn glass assemble over install a rope about 1/4 inch from top ending at bottom center. It does help to install dole rods about one inch in diameter to ends of rope. This help when pulling ropes also a cotter pin puller used to help guide rubber over window lip. Try to set the assembly in center of opening. Now follow operation out lined from TSM.
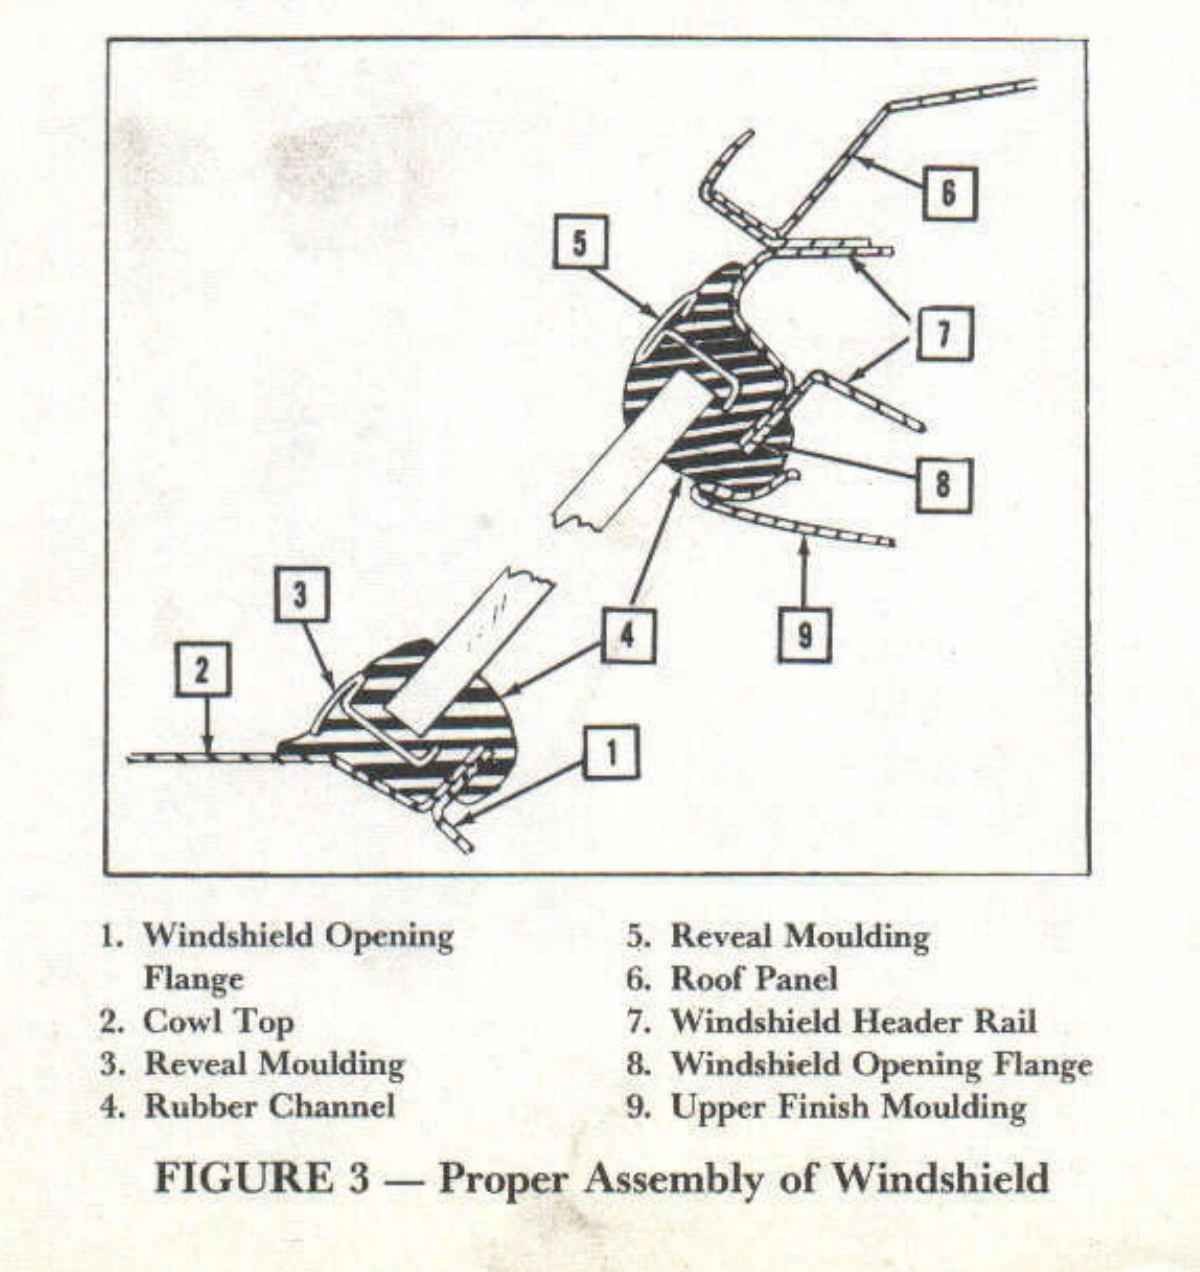
The lip of the rubber must be inside of the concave side of the glass when installed .
Install the rubber on one end of the glass first and apply several pieces of masking tape to hold the rubber to the glass while the remainder of rubber channel is installed , using masking tape at intervals to retain the rubber to the glass , make sure your glass is clean or the tape wont stick to the glass . Then tie two cords around the center of the glass approximately 6" to 8" apart to hold the rubber to the glass while installing the reveal moldings then remove the tape .
Center the molding on the glass and rubber channel . Then insert one end of molding under the cord and in groove at top center of the glass . Use a fiber or hard wood wedge shaped tool to spread the lip . Open groove and push molding flange into the groove until the molding down into rubber channel .
Continue to push the molding flange into the groove until the molding are set into the rubber.
Use two cords 14 feet long , Insert a cord in the groove of rubber , starting at the top center of the glass and continuing around to the other end at the bottom center .
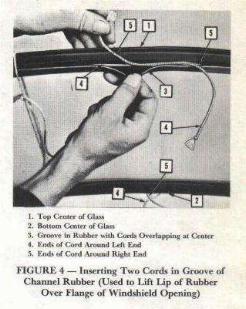
FIGURE 4 --Inserting Two Cords in the Groove of Channel Rubber ( Using to Lift Lip of Rubber Over Flange Of Windshield Opening )
Apply a 1/2" bead of sealer completely around the windshield opening ledge , NOT THE FLANGE .
Place the windshield assembly in the opening and remove the cord which held the rubber to the glass .
Center the windshield assembly in the opening remove the cord which held the rubber to the glass .
From inside of the car , pull the bottom cord upward parallel with the windshield to lift the lip of rubber over the windshield opening flange . First one side then the other .
Tap the windshield firmly with the heel of hand or a soft rubber mallet on the outside to set the windshield in position . Then pull the upper cord until the lip is completely lifted over the flange on one side , then the other .
When pulling the cord , hold a cloth on the cord to remove the sealer that may cling to the cord .
Apply windshield sealer between the rubber and the glass remove surplus .
Replace the wiper arms and the blade assemblies .
Replace interior finish molding , sun visors , and rear view mirror .
Many times it is assumed windshield leak when in reality the leakage is from another source . Possible sources are loose screws on outside of the dash insulation pad clips or radio antenna lead in.
Leakage between sealer rubber and body . With a pressure type caulking gun with a tube of butyl rubber seal between the rubber and the glass and between the rubber and metal.
Disclaimer: This site is not intended to instruct or teach anyone in proper or safe methods of working on or maintaining a car and the author takes no responsibility for the use of the information contained herein.